donderdag 31 januari 2013

Wreath Made Of Honesty/Silver Dollars

A few years ago I had a lot of honesty/silver dollars in my garden. I didn't just want to pull them out and throw them away and ponderd a while on what I could do with them.
Then I had the idea of making a wreath with them! I want to warn you in advance, this is a project for people with a lot of stammina and is very very time consuming!
This is what the end result looks like


When I started, the seedpods didn't look all nice and shiny like they do on the photo. The seed pods on the plant have a husk around them which you have to gently rub off/remove one by one!
This is the "before" photo of a seed pod.


This is the "after" photo


I did all this while the pods were still on the plant. About eight hours later I had enough to make the wreath from. When cutting the pods off the plant, try to leave as long a stem as possible on the pod so you can stick it deeper in the base.
This is the type of base I used. It has a plastic back


Then I spent countless more hours sticking the pods in the base. Try to pack the pods tightly next to each other for the best result to completely cover the base.
If you like the idea but don't have enough honesty/ silver dollars you can combine it with eucalyptus or other plants which dry well.
If you like the idea but have no honesty/silver dollars you can sow them yourself but you will have to be very patient because it's a biennial plant so you will have to wait two years for the flowers and seedpods
I hung my wreath on the wall but you could also lay it flat on a surface and place a candle in a glass storm lantern in the hole in the middel. Don't use a candle without "protection". Dried plants are very flamible and I wouldn't want your house to burn down!


woensdag 30 januari 2013

Keep Your Necklaces Tidy

Over the years I have accumilated a large number of necklaces. Some I received as gifts, some I bought in shops or at yardsales and some I "inherited" from family.
When you have such a large collection it can be a challange to keep them from getting muddled up but I have found the perfect way to keep them tidy.


I have attached a towelrail similar to the one in the photo to my window.
Then I hung all my necklaces from it using bent paperclips or sturdy pieces of wire. With the following result
I have mine hanging in front of the window so that the light can shine through them but you can attach the rail on the wall or on the inside of a cupboard door if you wish.
Sometimes I rearrange them according to colour or material but eventually they end up mixed up but never muddled up! 


woensdag 23 januari 2013

Hanging Window Decorations

In the village I live in we have a lot of tourists and some of them think it's a kind of open air museum and don't hesitate to press their noses against the windowpanes to look inside our houses.
I have tried different things to detere this except full length curtains which I dislike. First I tried potted plants but they grew through the holes in my croched curtains which made cleaning the windows a time consuming event.
Then I had an idea... I love stained glass windows and thought I could make mock stained glass window hangings
This is what they turned out like...


I made them using sheets of perspex which I had made to size, self adhesive plastic used to block the view through windows, permanent glasspaint en self adhesive lead strip bought on a roll.


As I said ealier I live in Europe but I'm certain these things are available in your area perhaps under a different name. Except perhaps if you live in the middle of the Amazon jungle, Sarahan desert or arctic circle.

I started by drilling holes in the corners of the perspex so that I could hang them when they were finished. Then I drew the design I wanted to use on the back of a piece of wallpaper and placed the perspex on top of it. By doing this you can see where you have to place everything. What you do next depends on what you are going to use. If you want to use the selfadhesive plastic you start by sticking that on in the position you want. This sounds easier than it is... If you only want to use paint paint the areas you want painted.I used "medium" to make the paint thinner and more translucent. Don't use your best watercolour brushes because this paint will ruin them.
I left some areas bare but feel free to do what you want. Lastly I stuck on the lead tape to divide the areas.
I used 3 squares, one for each window but you could place a several next or under each other and connect them with chains. You could also paint them in solid colours or mix colours together on the perspex. The possibilities are endless!
Lastely I attached chains and hooks to them and hung them on my curtainrod but you could also screw hooks into your windowframe.

I was very pleased with them when they were finished although they didn't bring the result I wanted. The tourists now stop to admire them!

I also made one for the window next to my backdoor. For this one I used selfadhesive plastic and releif paint which comes in a tube.


dinsdag 22 januari 2013

Make Your Own Air Freshener

This time I want to share an idea with you that anyone can make.
In our culture "toilet smells" are not done. Advertisments bombard us with all kinds of sprays in a scala of shapes and sizes and fragrances to mask unwanted odours.
Being the frugal person I am I never bought these things but opened the window or lit a match instead. But then I had an idea...
I got a spray bottle with a screwon top. In my case it was a nasal spray bottle. Our toilet/loo or if you are an American, restroom is tiny so that was big enough for us.
Here are some other bottles you could use


Then I put some perfume in it, you only need a small amount. I find that it's the perfect way to use up all the samples you get in shops which smell quite nice but not nice enough to wear on your skin. If you're a fan of pure and natural things you could put a few drops of essential oil in.


Then I top the bottle up with water. If you're afraid of germs growing in the water you could use alcohol. I have used this method for years and still haven't contracted Legionnaires disease so perhaps it's an unfounded fear.
If you like this idea but don't like the bottles used you could hunt around for one of these...

Perhaps you have an old aunt or granny who has one or you could find a one that still works in a yardsale of thriftshop.
I hope this article is usefull to you. Having you're "smallest room" smelling of Channel no 5 is much nicer than the store bought sprays.

zaterdag 19 januari 2013

Give An Old Shell Lamp A New Lease Of Life

I don't get tired easily of the things I have in my home but I have noticed a slight change of taste over the years. I have had a shell ceilinglamp for over 25 years and there was nothing wrong with it but I thougt it a little boring so I decided to make it a little more colourfull. The changes I have made can be ondone in a matter of seconds so you can't go wrong here.
This is how it's looks now....


This is similar to how it looked before I started                  


I started by painting a piece of sturdy transparant plastic in the colours I wanted using permanent glasspaint. I used two colours for the big circles and mixed them together a bit on the plastic for a livelier effect.
Then I used a pair of compasses to work out the measurements of the shell circles and when the glasspaint was completely dry I made circles of the right size on the back of the plastic and carefully cut them out with a pair of scissors. Then I glued them on using photo glue which can be easily removed and doesn't leave a residu.
I just had the coloured circles on the lamp for a few years when I decided to liven the lamp up even more.


For the figures I used relief paint.
I live in Europe but I'm sure there must be similar products all over the world


I also had some pieces of mirror left over from another project and stuck those on at a later date. For this I used my trusty gluegun. Because I stuck it on the plastic instead of the shell I can remove it at any time without leaving a trace as I said earlier.
Using this method you can stick on (almost) anything you want and as often as you want.
I hope I have inspired you.

vrijdag 11 januari 2013

Make Your Own Decorative Oillamp

When my daughter left home to get married a few years back she took her stuff with her. She also left a some of it behind. I hate throwing things away and sitting there on the floor I let each item pass through my hands wondering what to do with it ( throw it in the trashcan, donate it, keep it or recyle it). Then I came across a pretty little perfumebottle. At first I thought of throwing it away but then I thought "I could make an oillamp out of this!" And so I did...


To make one yourself you need an empty perfume spraybottle. Since I made this one I had a look at all my perfume bottles and noticed that the old ones use a different method to attach the spray part to the bottle. If you don't have an old one yourself you may find one in a yardsale or thriftstore


Now comes the dangerous part.... prying off the gold metal part. I used a penknife and a pair of small plyers. I also wore a pair of safety goggles just incase it all went wrong and would result in pieces of glass flying through the air. GENTLY try to bend the metal outwards, take your time and don't use too much force, you don't want to cut yourself and need stiches!
After you have removed the working parts your bottle is ready to be transformed into an oillamp.


In the above photo you can see two methods used in oillamps. I had a glass part from an oillamp I once bought at a yardsale but decided I didn't like after all and luckily it was the right size. You also need a piece of wick.
After filling your bottle with lampoil and placing the attributes your little oillamp is ready to use!
Just two words of warning.... choose a bottle with a broad base and place it on a firm stable surface. If a lighted oillamp falls over it turns into a molotov coctail instead of a romantic atmospheric light!
Secondly keep lampoil out of reach of small children. Especially the coloured oils are very attractive to children and if ingested it could result in chemical pneumonia!

I have used my little lamp often and am glad that I got the idea to reuse it.

woensdag 2 januari 2013

Silk Flower Wallhanging

When the news gets around that you like to create things people give you all sorts of things they think you might have a use for. Once I was given a big plastic bag full of silk flowers. Because there are only so many silk flower arragements a person can have in their home I put the bag in my closet where it stayed for quite a few years before I thought of a use for them.
One day I stood holding the bag in my hands while tidying the closet wondering how I could use them all up in one go when I had an idea! I could use them for a floral wall hanging.This is the end result:


It's very easy to make. All you need is an artists canvas, a gluegun and lots and lots of silk flowers. I thought that I had more than enough but in the end I had to ask the lady who gave them to me if she had some more which luckily she had.
I started by cutting all the flowerheads off the stems and putting them into a mesh laundrybag and washing them with a bit of laundrypowder in the bath because some of them had got a bit dusty over time. After rinsing the bag with flowers I spun myself round in the garden to remove excess water ( I hope no one was looking) and let them dry thoroughly on the centralheating radiator.


Then comes the fun part.. glueing the flowers onto the canvas. Take care not to burn your fingers on the hot glue! I placed the flowers randomly trying not to be too pickey about which colours to place next to which and alternating large and small flowers ( just like mother nature does)


I also went over the edges covering all the visible canvas but if you wanted to you could glue a ribbon around the edge.
If you like the idea but don't have enough flowers you could make one or more small ones and make a group of them on the wall.
I also used up my own old silk flowers which were a bit tatty and sunbleached. In amongst all the others you don't notice they aren't as "fresh" as they once were.
If I've inspired you but you don't have any silk flowers, I recommend you have a look in thriftstores and yardsales and ask around in your circle of friends and family. I'm sure some of them have silk flowers lurking around in their basements, attics, and closets.
The end result may be a bit tackey but I think in the right surroundings it would look great and certainly be a conversation piece. I know I cheer up no end whenever I look at mine!

dinsdag 1 januari 2013

Pimp an Old Bag

I love reusing things other people want to get rid of. I hate waste, the world has enough trash as it is and it gives me a lot of satisfaction to know I have saved an article from the wastedump and have given it a new lease of life.
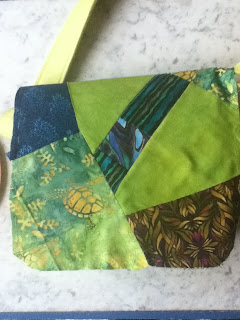
I was very pleased when a colleague of mine asked me if I had any use for a green felt shoulderbag she didn't want anymore. She had sewn square patches of fabric on the front and it looked quite nice as it was but the sewing was a bit shabby.
So I removed all the fabric and let my imagination run free.....


First I looked in my fabric stash to see what colours would look nice with the felt and I found a piece of cotton exactly the same colour as the bag itself. I also found a pretty piece of batik material with seaturtles on it and that inspired me to give the bag a sea theme.


This is when the fun part started and I got all my beads and ribbons out. My colleague also gave me her beads and ornaments because she had stopped that particular hobby so I had al lot of new stuff to work with.
I started with a piece on which I sewed flowing seaweed and pearls.


And then I did a bit with more seaplants and some lovely fish which she had used in a bracelet I dismantled.


I was quite pleased with the finished result. I don't know if I am ever going to use the bag but I had a lot of fun making it!